SIP Trunk Setup
SIP Trunk Setup for X25 & X50 Systems
SIP Trunks are VoIP Telephone Lines. SIP is Session Initiation Protocol. SIP is the latest iteration and most widely deployed VoIP (Voice Over Internet Protocol) is use today because of its superior performance over the previous implementations. SIP is a business-class protocol for connecting a VoIP capable system like the XBLUE X25 and X50 systems to the PSTN (Public Switched Telephone Network). SIP offers many advantages over traditional telephone lines:
- No hardware connection required – eliminates points of failure
- Digital connection – often superior to analog
- Digital features – DID functionality supported at very low cost (DID is Direct Inward Dialing… you can have multiple telephone numbers and route each as desired in the digital XBLUE telephone system)
- Fail-Over ability, in the event your server is not reachable (Internet or hardware failure, weather caused or otherwise) your telephone calls can be routed to an emergency destination (cell phone etc.)
- Cost effective and usually less expensive than regular telephone company analog telephone lines
Conditions of SIP Trunk (voice) delivery over the Internet:
- Bandwidth: delivery of your SIP Trunks is via the Internet this means that you will need a good Internet Connection to have a good experience. We recommend 5Mbps DOWNLOAD and 2Mpbs UPLOAD speed minimum and this will be greatly influenced by whatever else you are doing on the Internet and the number of SIP Trunks in your subscription. SIP Trunks take very little bandwidth but if there is other activity occurring on the network that occupies a lot of bandwidth, this will impact the voice service. Use http://speedof.me/ or similar speed test utility to test the speed of your Internet connection.
- Service Vulnerability: your system and lines should be adequately protected to ensure your service isn’t used by someone who wants to makes calls on your service. See our guide on Security. This is especially important when your XBLUE server is connected directly to the Internet. (In most cases the XBLUE server is connected “behind” another Router which greatly increases the security of the installation.
Understanding your Service Providers Information
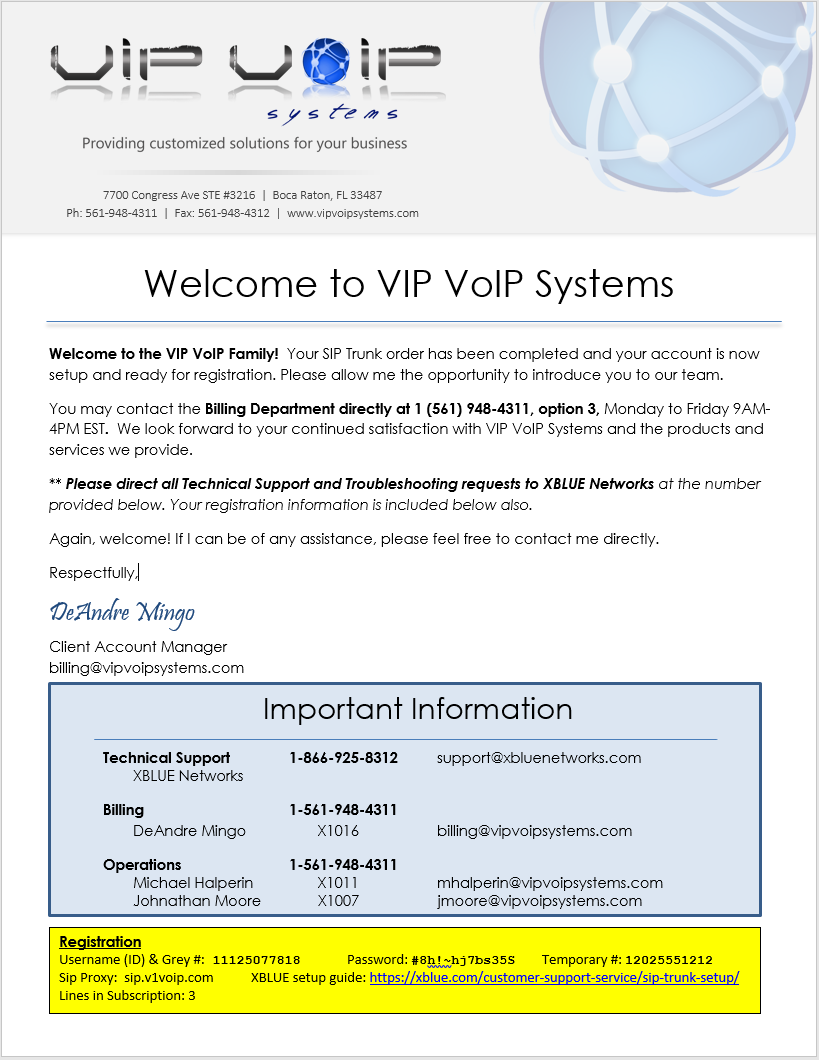
You will receive a Welcome letter and credentials from your SIP Trunk provider. There is an example at the right. Based on the service provider they will provide various features and support. The example is from VIP VoIP… in this letter they list XBLUE as the primary contact for support. KEEP the letter in a safe place. You need the information and you need to keep it safe from anyone that may use it to gain access to your subscription. Once you have found the information on your letter concerning Registration you will be ready to program your XBLUE server to access that service. Depending on the SIP Trunk Provider their terminologies may be slightly different.
Registration Data
In the example registration information you’ll find all the parts that make your service function:
- Username (sometimes called “Authentication ID”)
- Password (sometimes called “Secret” or “Authentication Password”)
- SIP Proxy (sometimes called “server” or “SIP Server”)
- Service Port (sometimes called “port”)(if there is none listed the default port number of 5060 can be assumed.
You’ll also get a temporary number or permanent number if you’re getting a newly assigned telephone number.
Temporary Numbers: are numbers that are provided until the “Port” is complete. You can have your current carrier Call Forward your current telephone number and service to the Temporary Number when you service is registered to start using your SIP Trunks for both outgoing and incoming calls.
Permanent Numbers: are numbers that your new carrier has allocated to your service. This is your new telephone number.
More on DID’s: Direct Inward Dial numbers are other numbers that can be used with your service. In the example the main service number is 12025551212… you might also have 12025551213 and …14 etc. DID’s are numbers that other people dial to reach certain people in your office on the XBLUE system. The XBLUE servers (X25 & X50) each can handle up to 50 DID’s.
Setup – IP Trunk
To complete the setup of your SIP Trunks you must access your XBLUE server. If you need help with this you can reference the Quick Install Guide that came with your system or see it on our website at: https://xblue.com/x25-x50-x50xl-quick-installation-guide/. Once you are logged into your server you will input the credentials for your SIP Trunk Registration into the IP Trunk page of your server… your SIP Trunk provider has given you all the information needed. In the example from VIP VoiP its all in the yellow box. Match the XBLUE Server data field to the information received, input as follows:
IP Trunk
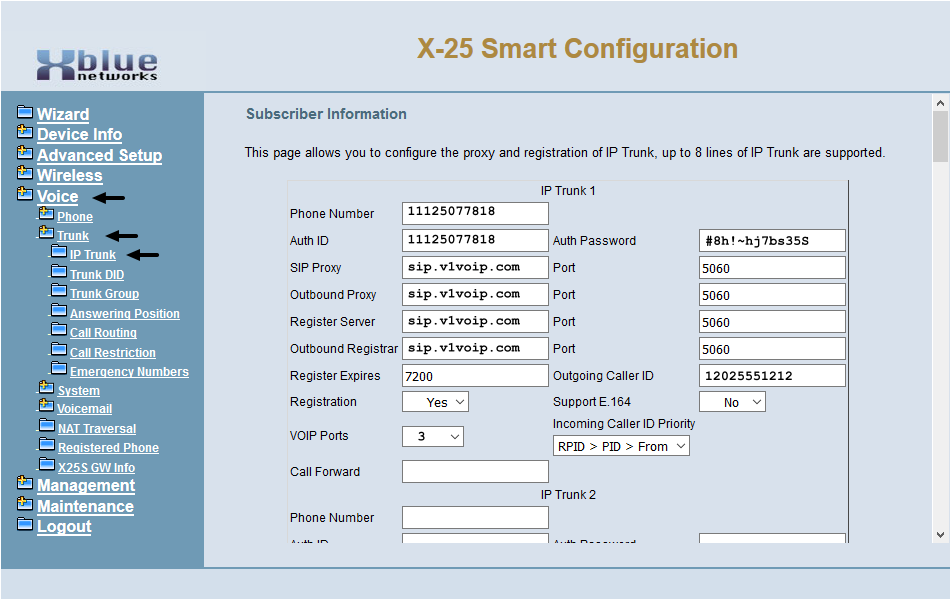
- Navigate to Voice – Trunk – IP Trunk.
- Input Username into the XBLUE server data fields:
- Phone Number
- Auth ID
- Input the Password into the XBLUE server data field “Auth Password“.
- Input the SIP Proxy into the XBLUE server data fields:
- SIP Proxy
- Outbound Proxy
- Register Server
- Outbound Registrar
- Unless your provider lists a specific Port use the default port number 5060.
- Input the Temporary or Permanent Telephone Number into the data field “Outgoing Caller ID“
- Set the number of VOIP Ports to match the number of channels or Lines you have in your subscription.
Setup – IP Trunk – Checking Registration
Once your SIP Trunks are programmed they will register to the SIP Trunk provider. Check the registration on the Diagnostics page:
IP Trunk – Registration Confirmation
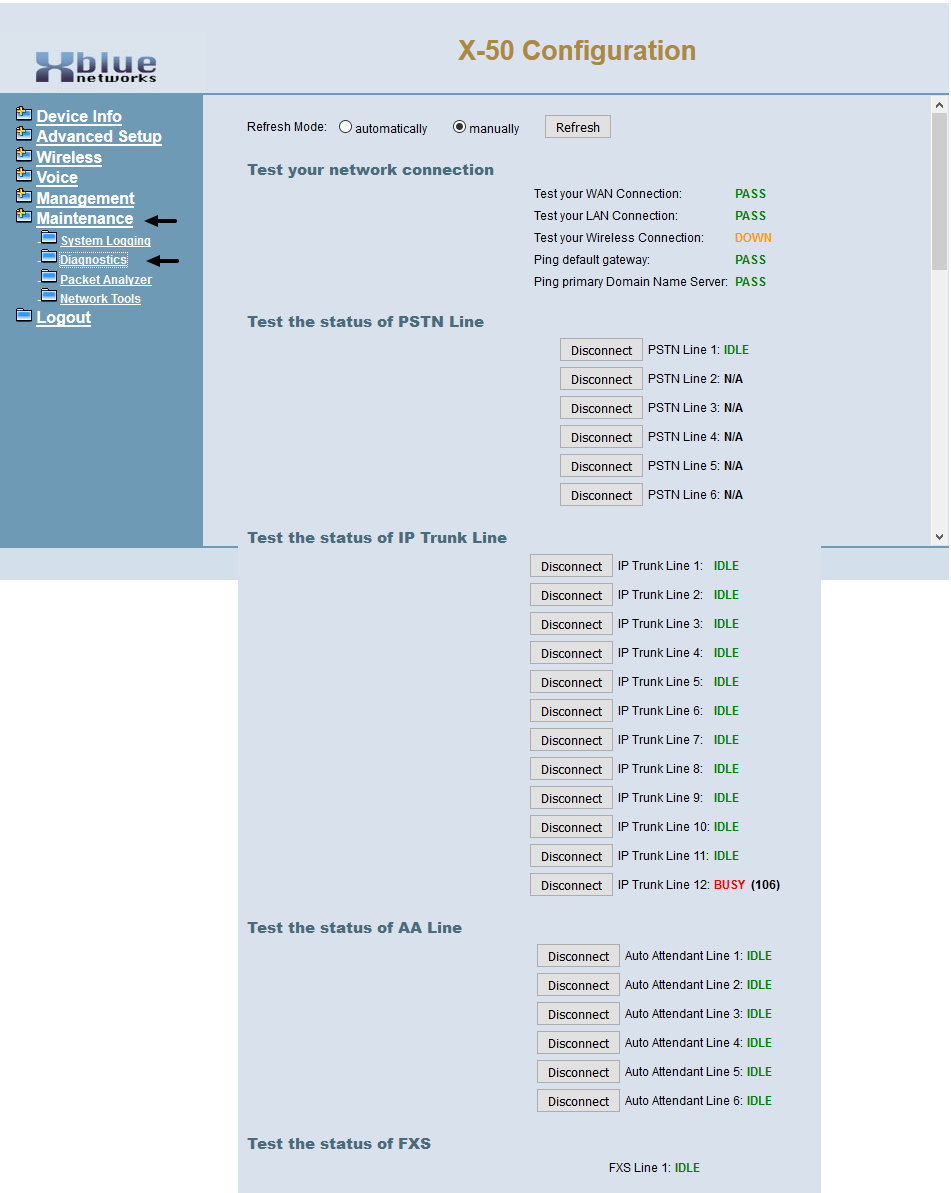
- Navigate to Maintenance – Diagnostics.
- In the example screen shot you’ll see that there are 12 IP Trunks registered on this system. If your subscription is 3 Lines you’ll see status for only 3. (All unused ports will show “N/A”.)
- Look for the “Idle” condition on IP Trunk Line 1… this is the most critical since the first line of a registration indicates the success or failure of the registration for ALL lines.
- If your Line 1 FAILS the remaining lines in that subscription will not work. (They may say “Idle” but they cannot work without a successful Line 1 registration.)
- If Line 1 is “Idle” it means that any Line in this registration is ready for calling. (in/out)
- If your Line has “FAIL” as the result, return to the previous Voice – Trunk – IP Trunk page and review your data… its usually the password but all data MUST be exactly as sent by your provider. Please reenter and try it again.
Setup – IP Trunk – Answering Positions (Ringing)
The XBLUE server is factory configured for default settings that satisfy these goals:
- Ring all phones when calls come into the system (accomplished using UCD Groups where many phones can be one Ring Position [Destination]).
- At default UCD Group 430 is the destination for all Line ringing.
- At default all XBLUE extensions are members of UCD Group 430.
- If ringing calls go unanswered for 20 seconds the caller is rerouted to Automated Attendant Menu 0 (AA 450)
- Auto Attendant gives the caller choices on extension (system user) calling.
- Auto Attendant can be programmed for single-digit translation (“Dial 1 for Sales”, etc.) see “Single Digit Table” in the Installation and Maintenance Manual for more information… X25, X50
- The Auto Attendant greetings (Day, Night, Holiday, Lunch, and Temporary) can be recorded with a custom greeting. Greetings Day and Night minimum should be recorded so that your customers experience your business’ welcome. See the simple guide for Auto Attendant Greetings (Announcement Recording Steps) recording.
If you want ringing patterns to be different you must program the Answering Positions to do what it is you intend.
Other related programming can be:
- UCD Groups, see the Installation and Maintenance Manual for more details X25, X50
- Single Digit Table, see the Installation and Maintenance Manual for more details X25, X50
IP Trunk – Answering Position
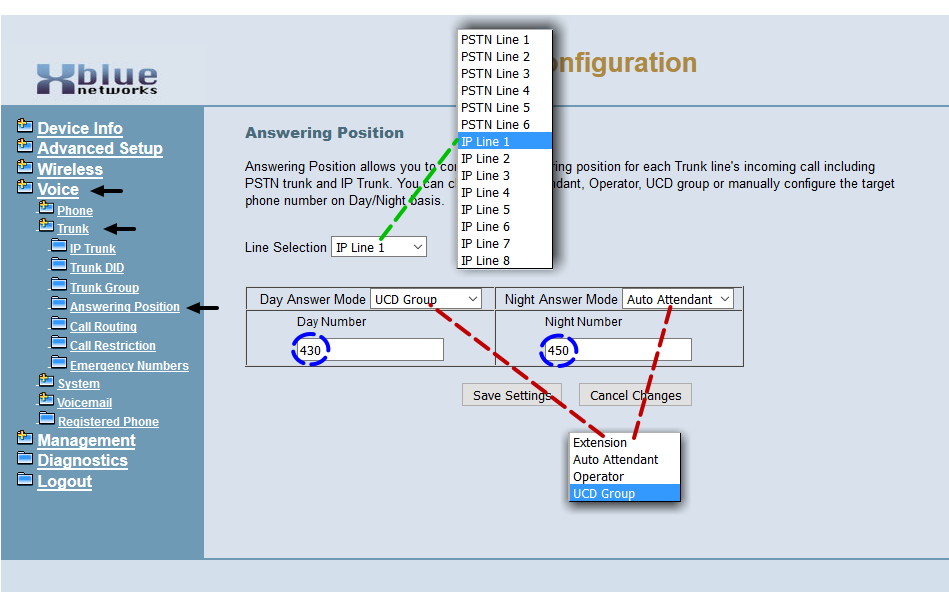
- Navigate to Voice – Trunk – Answering Position.
- The first Line is already selected and the Ringing Position (destination) is shown for that Line.
- Use the pull-down at Line Selection to select IP Line 1 (this is the first registered IP Trunk). The current settings for this Line are then shown.
- For both Day and Night Answer Modes select the category of destinations available. You can choose from:
- Extension
- Auto Attendant
- Operator
- UCD Group
- Once the category is selected you must input the directory number of the destination you want. (e.g. if you’ve selected “Extension” you can input 101-150 depending on the server capacity.)I’ve listed the defaults for reference.
Extension Auto Attendant Operator UCD Group 101-125 (X25&X50) 101-150 (X50XL) 450-459 0 430-433 - Go to the bottom of the page and click on Save Settings.
- Repeat for each IP Trunk that you’ve installed and click on Save Settings for each.
Setup – IP Trunk – DID Destinations (Ringing)
If you have multiple telephone numbers assigned to your registration (numbers that can be dialed by any telephone network caller) you need to list them in the Trunk DID table where they can then be directed to the desired system destination (person, UCD, AA, VMB). There are 50 table entries possible, so a total of 50 telephone numbers may be directed to your SIP Trunk registration… however the maximum that can be in use at any one time is limited to the number of subscribed lines.
IP Trunk – DID Destinations
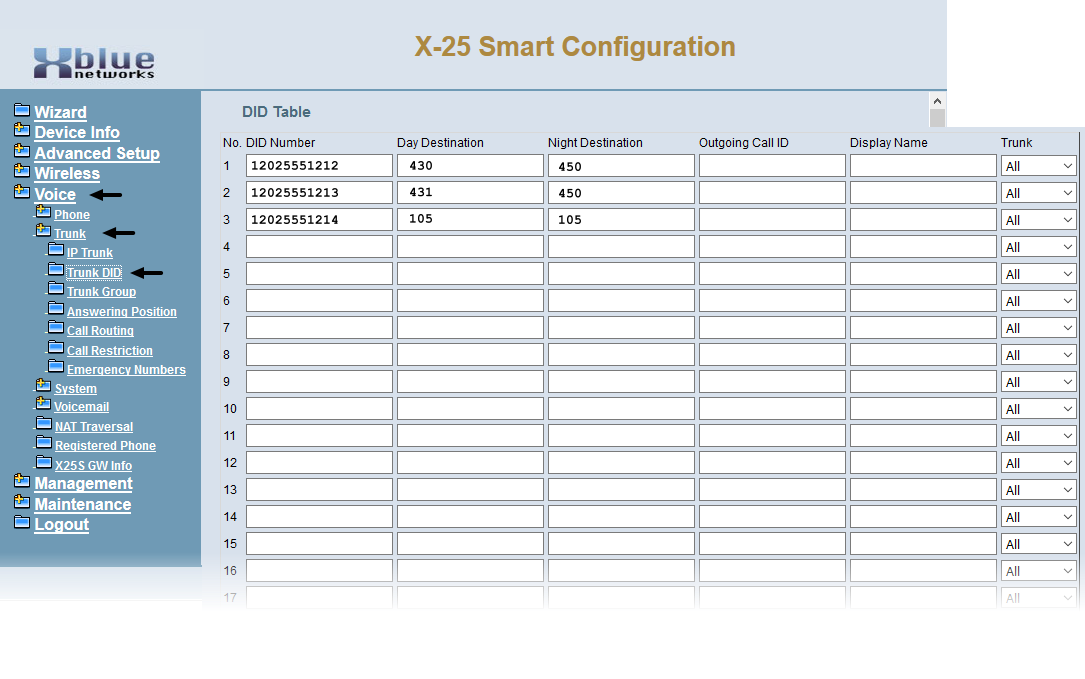
- Navigate to Voice – Trunk – Trunk DID.
- In this table you need to input the actual DID number as it is received from the carrier. In our example the carrier sends the digit “1” as the first digit so it must be input as well so that the match can be made. Please check with your carrier/provider to ensure you have the correct format (1+ or just the 10-digit DID).
- Input for Day & Night Destination the system directory number where you wish calls to this DID to be directed. In the example, DID’s:
12025551212 route to UCD Group 430 during the day and Automated Attendant Menu 0 (450) at night.
12025551213 route to UCD Group 431 during the day and Automated Attendant Menu 0 (450) at night.
12025551214 route to Extension 105 during the day and Extension 105 at night. - The DID Table allows the following destinations:
- Extension
- Auto Attendant
- Operator
- UCD Group
- Virtual Mailbox
I’ve listed the defaults for reference.Extension Auto Attendant Operator UCD Group Virtual Mailbox* 101-125 (X25&X50) 101-150 (X50XL) 450-459 0 430-433 830-845 (X25) 830-879 (X50)
* Although the Numbering Plan is set at default Virtual Mailboxes are not and therefore must first be programmed if you intend to use one or more.
- Outgoing Caller ID and Display Name can be input with the desired telephone number and name to be sent to the called party when this DID is designated to one specific extension. However it may not function regardless of programming here due to carrier restrictions. (It is not appropriate nor allowed by some carriers to masquerade as someone else… be advised this function will likely not work if you input a number that is not on your DID subscription list.)
- Go to the bottom of the page and click on Save Settings.